This tutorial will guide you step by step how to setup Solaris on OCI platform
References
Reference Commands
#zpool help
#zfs help
#pkg help
1. Register with OCI
Although this is simple process and expected to have a free account with Oracle Cloud Infrastructure
You simply register and complete the registration process from this point Oracle Cloud Infrastructure
Follow the simple instruction to create a new account and sign in.
Keep a note of Tenant, email, and of course your password
Cloud Infrastructures have their servers stacked into data centers which are clustered into one solid reliable unit called availability domain taking a form of AD-1,2, or 3 depends on how big the service area,
These availability domains are interconnected with each other with high performance network makes them work as whole unit serving an entire region
Why is that structure, this is a common practice between all service provider to provide high availability in case one whole data center or the entire Availability Zone goes down, it should have redundancy in another availability zone which minimizes the impact of affecting the service significantly.
you need to choose your default region, typically the one that is close to you, in my case it was US West (San Jose)
That’s it you are done. here.
3. Create your Solaris 11.4 platform
You need to build an accessible secured infrastructure to host your Solaris 11.4 on OCI cloud
3.1 Network infrastructure
Create the following resources and connections
- A Compartment to host all your resources
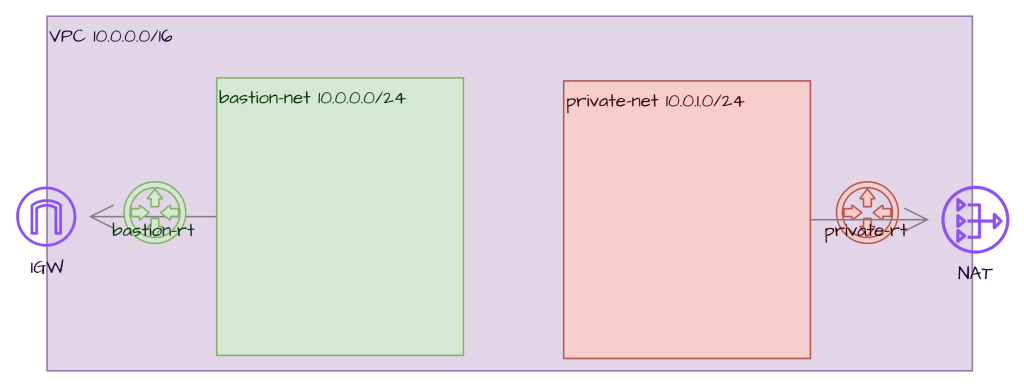
- VPC a virtual private cloud to have your subnets : ex. CIDR 10.0.0.0/16
- Two subnets at least 1 public ex. 10.0.0.0/24 –bastion net and/or private subnet ex. 10.0.1.0/24
- Setup routing tables for each subnet ex. bastion-net, and private-net
- Create an Internet Gateway as route destination for bastion-net, ex. destination 0.0.0.0/0 to igw
- Create a NAT gw, without routing table, and add a route rule in the private-net such as 0.0.0.0/0 targetted NAT GW
- Setup the Security List to allow inboud traffic port 5901 and 22 for VNC and SSH respectedly from a safe source,
- Create as necessary ssh keys for instances
3.2 Oracle Solaris 11.4 instance
Create an instance in either bastion (public) or private net, with the following settings
Basic Information
- Name the instance
- Choose the compartment (from previous step)
- Choose the proper placement and advanced options
- Choose Change Image>Market place->search for Solaris
- Select the only available image (currently 11.4.87)
- Select the shame ex. VM.Standard.E5.Flex with 2 OCPU and 24GB
Networks
- Select the VPC for this install,
- choose either private or public subnet
- Add the SSH Keys that were created for this setup
- Specify boot volume >50GB
/* Launch the instance */
4. Remote connect to your instance
Now your instance got the green status Running, from this point on select your instance to get the details in the General Information tab, take a note of your Primary VNIC section and record your Public IPv4 address. should be something like this 204.28.39.143.
At this point, Oracle has placed your instance in a networking structure that can access the internet without problems. yet blocked the networking for security reason which is the default setting.
We need to connect to our instance using SSH protocol which uses port 22, so let’s open our network to allow this connection go through.
Use this guide to help you connect to a Linux instance using openssh or Connect to a Linux instance using Putty.
The default user for Oracle Solaris is opc (Oracle Public Cloud user).
once you log in, set your password (this step necessary to setup VNC)
$sudo passwd <enter-new-password>
and we are done here, let’s grab a cup of coffee!
Create a package repository
- Create a package repository
- Repository Sources:
The Oracle Solaris release repository: http://pkg.oracle.com/solaris/release/
The Oracle Solaris support repository: https://pkg.oracle.com/solaris/support/
- Copy a repository from a Zip file
- Dependency and Architecture (SPARC & x86)
$pkgrepo verify: verify packages- Oracle Solaris 11.4 Bundled Software Updates
- Find the network interface name
$ ipadm show-if /* ex. net0 */ - Allow ports 5901 and 22 for remote connection
$ sudo pfedit /etc/firewall/pf.conf
/* Add the following line for ex. net0*/
pass in quick proto tcp from any to any port 5901 - Restart the firewall
$ sudo pfctl -f /etc/firewall/pf.conf - Enable/Disable firewall
$ sudo svcadm disable|enable network/firewall - Check the status of firewall
$ sudo svcs -x firewall:default
The file system in Solaris consists of tree structure of file systems start with a root (/) file system. File systems can be attached (mounted) or detached (unmounted) from the file system tree.
Solaris uses VFS (Virtual File System) as an interface to all types of file systems. Supported file system types (such as ZFS, Network File Systems, Virtual File Systems)
- Compress data on copy, bandwidth restrictive, restart/resume transfer, checksum enabled, remove devices from pool, clone dataset, accelerate cp -z, storage pool, multiple filesystems, automatic mount/unmount, ACL(Access Control List)
- Storage Pool (128MB-any size)
Command: zfs create <the zpool>/<repo-filesystem>;
#zfs create repo/solaris-release  <- creates mounted filesystem /repo/repoSolaris11
#zfs set atime=off repo/solaris-release  <-for better performance
#devfsadm -Cv
#zpool destroy <poolname>
2. create an instance
In the cloud, the term instance refers to the compute server you planning to employ, so basically think you are in the shopping mall want to buy a computer and you got to chose the Hardware which we call it here the instance Shape, and the operating system installed which we call it here the instance image.
One note you need to understand is the concept of compartment, a compartment is an organization structure to host related resources (such as compute instances, databases, storage etc.) and have a logical grouping or these resources. not physical!
About SSH keys, as per the fact that you would never been able to touch your server physically then your best option is to remote connect, yet you better be secure., that’s why we need to create a key pair key consists of private key and public key in accordance to the PKI Public Key Infrastructure standard which dictates that you should have two keys generated in pair, one to encrypt messages which is the public key, and the other to decrypt the messages which is called the private key, as the name implies, you distribute the public key to the public and make sure the private key is well protected and securely saved, never share it with any one, including your spouse (if you can). during the creation process you will generate this pair of keys and Oracle keeps the private key inside your new instance and asks you to download the private key. you will use it later to connect to the instance.
Choose the boot volume, use the default Use in-transit encryption that’s your instance storage
Follow this tutorial to create an Instance
Guess what! we done here too
4.Solaris GUI Desktop
- Links:
- Working with the X Window System
- Setting up Remote Desktop Access using VNC
- Download the Oracle Solaris VM Virtual Box
- Install Solaris Desktop Package
#pkg update --accept
#pkg install solaris-desktop
-
- Xorg : /etc/X11/xorg.conf and xorg.conf.d)Administrator creates xorg.conf to allow change the default configurations.Restart the X Server
#svcadm restart gdm
-
- Oracle Solaris SMF configuration properties, use SMF service svc:/application/x11/x11-server
# svccfg -s svc:/application/x11/x11-server setprop options/config_file=xorg.conf- Hardware Abstraction Layer HAL fdi files: configuring input devices
$XAUTHORITY to establish connection with X Server
User Access granted using si:localuser:
user@host:~$ xhost +si:localuser:root
user@host:~$ su
Password:
/**Visual Panel GUI**/
# /usr/bin/vp svcs
Use X11 Tunneling options of the ssh command to connect to a remote X Client
Use Virtual Network Computing (VNC) to view and interact with remote desktop.
Setup VNC to provide a guest graphical Login A boot environment is a bootable instance of the Oracle Solaris image and its component software packages. When you install Oracle Solaris for the first time, or upgrade the OS, a BE is automatically created on the system. The BE is also activated and becomes the default BE that is used when the system is rebooted.
Oracle Solaris 11.4 Information Library
5. Install solaris-desktop
Install Solaris Desktop
$ sudo pkg update –accept
$ sudo pkg install solaris-desktop
$ sudo pkg info solaris-desktop
Name: group/system/solaris-desktop
Summary: Oracle Solaris Desktop
Description: Provides an Oracle Solaris desktop environment
Category: Meta Packages/Group Packages
State: Installed
Publisher: solaris
Version: 11.4
Branch: 11.4.87.0.1.207.2
Packaging Date: Thu Nov 13 20:58:56 2025
Last Install Time: Sun Nov 30 00:36:00 2025
Size: 2.52 kB
FMRI: pkg://solaris/group/system/solaris-desktop@11.4-11.4.87.0.1.207.2:20251113T205856Z
/* reboot */
vncserver is included in the installation
6.Configure VNC Server
Configure GNome Server
Set VNC Password for user opc, this is required when the vnc server locks the screen,
$sudo passwd opc
7.Start and Connect to VNC Server
Start VNC Server
- Start the vncserver
$vncserver [-fg]
/* use this -fg to debug server startup */
/* You can set vncpassword before hand */
$ vncpasswd Password:****
Retry:****
Would you like to enter a view-only password (y/n)? n
A view-only password is not used - Verify VNCServer is listening
$ netstat -an | grep 5901
Add VNC as a service
$ sudo svcs -a | grep -i vnc /* Check the status */
disabled 2025-11-30T01:12:15 svc:/application/x11/xvnc-inetd:default
$ sudo svcadm enable svc:/application/x11/xvnc-inetd:default
$ cat /etc/services | grep vnc /* Verify entry was added to /etc/services */
vnc-server 5900/tcp # VNC Server
NOTE: The above procedure was not proven
Connect
Host: <the host> ex. station-01….or IPv4 Address
Port: 5901
User: <vncuser> ex. opc
Password: <vncpassword> ex. opcPa55w0rd
Login to Solaris Destiop with user opc/password
Drink Beer!
Updating Systems and Adding Software
To Access Oracle Solaris Support repository follow these steps:
- Create SSL Certificate: Choose Solaris 11.4 and generate. Note: it is not visible then you have to do the update manually.
- Download the public/private keys from the certificate page to .ssh folder
$chmod 600 *.pem - Set up publisher configuration for the Oracle Solaris Cluster 4 Repository
$sudo pkg set-publisher \
-k ~/.ssh/pkg.oracle.com.key.pem \
-c ~/.ssh/pkg.oracle.com.certificate.pem \
-G "*" -g https://pkg.oracle.com/solaris/release solaris- Check Available Repositories
$ pkg publisher Solaris
Solaris OS Troubleshooting
- Solaris OS architecture
$/usr/bin/isainfo -kv - Run Explorer, First time use Oracle Explorer Data Collector Best Practices
- Oracle Services Tools Bundle (STB)
Mounting Block Volumes
- Services Tools Bundle (STB) – Information Center (Doc ID 2419123.2)
(Note: No Permissions allowed to download installation files use zip files loaded in the files folder of this ACADEMY.HAHLABS.COM) - Attach block volume to the instance and reboot
#explorer <-- use [-g] for first time installation; then [-w default] on next time
#format  to identify apid of the volume Ex. c0t607CC3B1C2734E01A16AF5360A039FEEd0
- Services Tools Bundle (STB) – Information Center (Doc ID 2419123.2)
- create a zpool of that volume
#zpool create {-m /repo} repo c0t607CC3B1C2734E01A16AF5360A039FEEd0 <- default mountpoint is /pool-name - Check filesystems
#zfs list <- now we have filesystem repo and mountpoint /repo - zfs filesystem offers independant configurable filesystem. Folders share parent filesystem configurations offers fast file move, both folders and zfs filesystems can use standard file and folder shell commands, however move data between folder and zfs (cp,mv) is considered moving between different devices (very slow), — use of rm -r <zfs filesystem> will result of error Device busy.
#zfs create -o mountpoint=<path-to-filesystem> <zpool-name>
#mkdir <path-to-folder>
- Download and install the package p36187033_24224416_Solaris86-64.zip
- Installation Guide
(*Note: Permission denied to download the files from Oracle, use files on ACADEMY Website*)
Lorem ipsum dolor sit amet, consectetur adipiscing elit. Ut elit tellus, luctus nec ullamcorper mattis, pulvinar dapibus leo.
- Services Tools Bundle (STB) – Information Center (Doc ID 2419123.2)
(Note: No Permissions allowed to download installation files use zip files loaded in the files folder of this ACADEMY.HAHLABS.COM) - Attach block volume to the instance and reboot
#explorer <-- use [-g] for first time installation; then [-w default] on next time
#format  to identify apid of the volume Ex. c0t607CC3B1C2734E01A16AF5360A039FEEd0
- Services Tools Bundle (STB) – Information Center (Doc ID 2419123.2)
- create a zpool of that volume
Command: zpool create {-m <mount-point>} <pool-name> <apid> #zpool create {-m /repo} repo c0t607CC3B1C2734E01A16AF5360A039FEEd0 <- default mountpoint is /pool-name - Check filesystems
#zfs list <- now we have filesystem repo and mountpoint /repo - zfs filesystem offers independant configurable filesystem. Folders share parent filesystem configurations offers fast file move, both folders and zfs filesystems can use standard file and folder shell commands, however move data between folder and zfs (cp,mv) is considered moving between different devices (very slow), — use of rm -r <zfs filesystem> will result of error Device busy.
#zfs create -o mountpoint=<path-to-filesystem> <zpool-name>
#mkdir <path-to-folder>
Import and export a zpool
Export a pool -> move the device -> import again
Export: removes the zpool from the system
Import: makes the zpool available in the system
Manual System update
- Download the [SRU’s-Support Repository Update] Oracle Solaris IPS Repository Installation Guide 11.3.0.0.0 IPS Repository Installation Guide and IPS Repository patches from MOS- My Oracle Support(Knowledge).
- Create and Update a Solaris 11 Local Repository Server (Doc ID 1928542.1)
- for details Copying and Creating Oracle Solaris 11 Package Repositories
- Prepare Repository file system repository, use
- Download the Repository from the internet
#pkgrepo create /repo/solaris-release <- Prepare the repository
#pkgrecv -s http://pkg.oracle.com/solaris/release/ -d /repo/repoSolaris11 '*'- Copy a Repository from a File (or iso)
- download the media from Oracle Solaris 11.4 Repository Downloads (Software Downloads->IT infrastructure->Solaris 11 -> Create Local Repository), media comes in muti-parts, follow the instruction to construct the iso image file install-repo.ksh
- Install unzip package
- Copy a Repository from a File (or iso)
for Solaris 11.4 package compress/unzip was removed in purpose, need to force install
Download SRU 65 from MOS

# pkg change-facet facet.version-lock.compress/unzip=false
# pkg install compress/unzip
# pkg change-facet facet.version-lock.compress/unzip=none <- none sets it back to default
#./install-repo.ksh -d /repo/repoSolaris11-iso -v -I -c <-- needs 15GB storage space- Check system locale
$localeshould include LANG=C - Build the search index
#pkgrepo -s /repo/repoSolaris11 refresh- Client Access
- NFS File share
# zfs create -o mountpoint=/repo/repoSolaris11 rpool/repoSolaris11
# zfs set share=name=s11repo,path=/export/repoSolaris11,prot=nfs rpool/repoSolaris11
name=s11repo,path=/export/repoSolaris11,prot=nfs
# zfs set sharenfs=on rpool/repoSolaris11
# pkg set-publisher -G '*' -M '*' -g /repo/repoSolaris11/ solaris
# pkg set-publisher -G '*' -M '*' -g https://pkg.oracle.com/solaris/support-oci/
# pkg publisher <-- list all publishers: should point to the new registery
# pkg info entire <--
# zpool status -l repo <-- information about a pool
Boot Environments
Solaris on VBox
- Full Text install of Oracle Solaris on VBox
Migrate to OCI Cloud
- eeporm set console=ttya (originally text)
Mounting FS on OCI Solaris
To mount a file system in Solaris, you can use the mount commands on the export of the file system
OCI Console–> File Storage –> File Systems –> File System details –> Export details
Mount File system
$sudo mount 10.30.30.70:/Classes-FS /mnt/Classes-FS
Automount File System
Edit /etc/vfstab
10.30.30.70:/Classes-FS - /mnt/Classes-FS nfs - yes rwEnable NFS Client Service
# svcadm enable -r nfs/client