- Create Oracle Linux 8 instance with 2 VNIC one in public subnet (Public IP) and one in private network both manually assign IP Addresses
- Install X Windows System OCI Compute
- Pre-Installation checks
- Swap file ( resize to 16GB)
# Check swap size # grep SwapTotal /proc/meminfo SwapTotal: 4194300 kB # Add 12 GB= 12 * 1024*1024 to swap file #dd if=/dev/zero of=/.swapfile-12GB bs=1024 count=12582912 #chmod 0600 /.swapfile-12GB #mkswap /.swapfile-12GB #swapon /.swapfile-12GB # grep SwapTotal /proc/meminfo SwapTotal: 16777208 kB #vi /etc/fstab <- edit fstab to auto mount on boot /.swapfile-12GB swap swap sw,comment=additional12GB 0 0 #cat /proc/swaps <-- check swap space - Set HugePages
# grep PageTables /proc/meminfo
# grep Huge /proc/meminfo
Edit
/etc/sysctl.confAddvm.nr_hugepages=10# sysctl -p - Edit /etc/fstab remove
noexec, nosuid - Install Oracle Database Preinstallation RPM
# dnf install -y oracle-database-preinstall-19c
- Swap file ( resize to 16GB)
# grubby --info /boot/vmlinuz-4.18.0*
# grubby --info=ALL
# grubby --default-kernel
# uname -r
# grubby --set-default /boot/vmlinuz-4.18 . . .
# grubby --set-default-index=1
# grubby --update-kernel=ALL --args "loglevel=3,LANG=en_GB.UTF-8"
# reboot
Configuring Users, Groups, and Environments for GI
- Switch the value of
ORACLE_HOMEfor each use or user - Groups created by oracle-database-preinstall-19c
oinstall:x:54321:oinstall <-- Oracle OUI users dba:x:54322:oracle <-- DBA backupdba:x:54324:oracle <-- OS Backup operator dgdba:x:54325:oracle <-- Data Guard administrator kmdba:x:54326:oracle <-- Key Management operator racdba:x:54330:oracle <-- RAC DBA oper:x:54323:oracle <-- Minimal operator - Create Job Separation Groups
# groupadd -g 54329 asmadmin <-- ASM Admin # groupadd -g 54327 asmdba <-- ASM DBA # groupadd -g 54328 asmoper <-- ASM Operator - Users created by oracle-database-preinstall-19c
uid=54321(oracle) gid=54321(oinstall) groups=54321(oinstall),54322(dba),54323(oper),54324(backupdba),54325(dgdba),54326(kmdba),54330(racdba) - Create Oracle RAC grid owner
# useradd -u 54331 -g oinstall -G dba,asmdba,backupdba,dgdba,kmdba,racdba,asmadmin,asmoper grid # usermod -g oinstall -G dba,asmdba,backupdba,dgdba,kmdba,racdba,oper oracle - Oracle Grid Installer creates
ASMSNMPuser (asmsnmp) during installation, used by EM to monitor ASM instances - Create folders and assign permissions
# mount /dev/oracleoci/oraclevdb /u01 <-- Attach and connect Volume
# mkdir -p /u01/app/19.1.0/grid <-- ORACLE_HOME
# mkdir -p /u01/app/grid <-- ORACLE_BASE
# mkdir -p /u01/app/oracle
# chown -R grid:oinstall /u01
# chown oracle:oinstall /u01/app/oracle
# chmod -R 775 /u01/
Setting Hard/Soft Limits
# vi /etc/security/limits.conf
@oinstall       soft    nofile  1024
@oinstall       hard    nofile  65536
@oinstall       soft    nproc   2047
@oinstall       hard    nproc   16384
@oinstall       soft    stack   10240000
@oinstall       hard    stack   32768000
Set up Environment Variables
in grid and oracle user ~/.bash_profile
export TMP=/u01/tmp
export TMPDIR=$TMP
export ORACLE_BASE=/u01/app/grid <--Oracle Base Directory u[00-99][00-99]/app/user
export ORACLE_HOME=/u01/app/21.3.0/grid <--Home directory for GI u[00-99][00-99]/app/release/grid
export ORACLE_SID=+ASM1
export ORACLE_TERM=xterm
Attach and Connect Volumes
- Create Volume from the console & attach it to the instance note mount point
/dev/sd[a,b,c...] - Create a primary partition on the disk
# lsblk
# ll /dev/oracleoci/oraclevdc <-- to find the /dev/sd[x]
# fdisk /dev/sda  <-- g create GPT partition table, n create partition n partition number(select full size)  w write and sync changes to disk
Setup VCN and VIPs
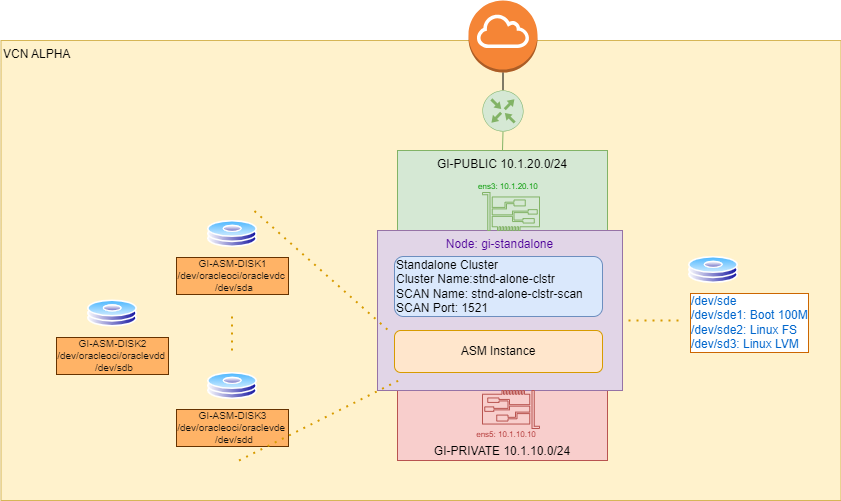
# Private Network cluster nodes -p 10-19
10.1.10.10 gi-standalone-p gi-standalone-p.rac.hahacademy
10.1.10.11 cluster-node1-p cluster-node1-p.rac.hahacademy
10.1.10.12 cluster-node2-p cluster-node2-p.rac.hahlacademy
10.1.10.13 cluster-node3-p cluster-node3-p.rac.hahacademy

# Public Network cluster nodes 10 - 19
10.1.20.10 gi-standalone gi-standalone.rac.hahacademy
10.1.20.11 cluster-node1 cluster-node1.rac.hahacademy
10.1.20.12 cluster-node2 cluster-node2.rac.hahacademy
10.1.20.13 cluster-node3 cluster-node3.rac.hahacademy

# Public Network SCAN Service name
10.1.20.55 stndalone-clstr-scan

# Public Network VIPs for cluster nodes -v 20-29
10.1.20.20 gi-standalone-vip gi-standalone-vip.rac.hahacademy
10.1.20.21 cluster-node1-vip cluster-node1-vip.rac.hahacademy
10.1.20.22 cluster-node2-vip cluster-node2-vip.rac.hahacademy
10.1.20.23 cluster-node3-vip cluster-node3-vip.rac.hahacademy
Set DNS and VNC
- Attach Public VNIC at instance creation hostname gi-public.gipublic.vcnalpha.oraclevcn.com <–<hostname>.<subnet>.<vcn>.oraclevcn.com
- Attach Private VNIC after instance is created gi-private.gipublic.vcnalpha.oraclevcn.com
- Edit /etc/hosts
127.0.0.1 localhost 10.1.20.10 gi-standalone.gipublic.vcnalpha.oraclevcn.com gi-public gi-standalone.rac.hahacademy - Edit /etc/resolv.conf Add the private and public subnets
search vcnalpha.oraclevcn.com gipublic.vcnalpha.oraclevcn.com giprivate.vcnalpha.oraclevcn.com nameserver 169.254.169.254 - create OCI Network private zone rac.hahacademy
standalone-clstr-scan A 10.1.20.55/56/57gi-standalone-vip A 10.1.20.20
- Set
NOZEROCONFflag in /etc/sysconfig/network# vi /etc/sysconfig/network NOZEROCONF=yes
# systemctl restart network
GI Networking
Attaching VNICs
- Private Subnet: Nodes interconnectivity with interface redundancy option
- Public Subnet: Application Servers, Users, other Clients
 Clusterware Networking
 - GNS Grid Naming Service: enables the cluster to map host names and IP addresses dynamically as nodes are added and removed from the cluster, without requiring additional host configuration in the DNS.
- SCAN Single Client Access Name: a stable name for clients to use for cluster connections, independent of the nodes that make up the cluster. SCAN multiple addresses of the listeners, virtual IP addresses, sharable with other clusters.

- Delegate Grid naming resolution to GNS from DNS
- Choose subdomain from the DNS main domain e.g
gi-clusters.mydns.domain.net - Configure DNS A Record to point to GNS
- Choose subdomain from the DNS main domain e.g
mycluster-gns-vip.example.com A 192.0.2.1 <--IP for GNS Server - Delegate DNS name resolutions to GNS
cluster01.example.com NS mycluster-gns-vip.example.com <-- cluster01 is the GI cluster domain - Create a private zone
rac.hahacademyon Oracle DNS server add A records for (gi-standalone , gi-standalone-p, standalone-clstr) on OCI console. - Configure
resolve.confon each node in the clusteroptions attempts: 2 options timeout: 1 search rac.hahacademy vcnalpha.oraclevcn.com <sbunet1,2..n>.vcnalpha.oraclevcn.com nameserver 169.254.169.254
- Disable selinux
vi /etc/selinux/config<– set SELINUX=disabled & reboot. - Install ASM Library and Support
# uname -r <-- make sure kernel 4.18.. is active
# dnf install -y oracleasm oracleasm-support kmod-oracleasm
# Download oracleasmlib-2.0.17-1.el8.x86_64.rpm from ULN Unbreakable Linux Network linux.oracle.com
Channel: Oracle ASMlib for Oracle Linux 8 (x86_64)
# dnf install -y /u01/Downloads/oracleasmlib-2.0.17-1.el8.x86_64.rpm
# oracleasm configure -i <-- User:grid, Group: asmadmin, start & scan on boot: Y
Configuration file: /etc/sysconfig/oracleasm
Mount Point: /dev/oracleasm
# oracleasm init
# oracleasm status
# systemctl status oracleasm - Create Disks and Disk Groups
# oracleasm scandisks
Reloading disk partitions: done
Cleaning any stale ASM disks...
Scanning system for ASM disks...
# oracleasm status
Checking if ASM is loaded: yes
Checking if /dev/oracleasm is mounted: yes
# oracleasm createdisk -f DATA1 /dev/sdc1 <-- run for each device attached the partitioned disk, use -f to force non partitioned disks
# oracleasm listdisks
DATA1
DATA2
DATA3
Install GI Grid Infrastructure
- Download the Software from Oracle Software Delivery Cloud portal
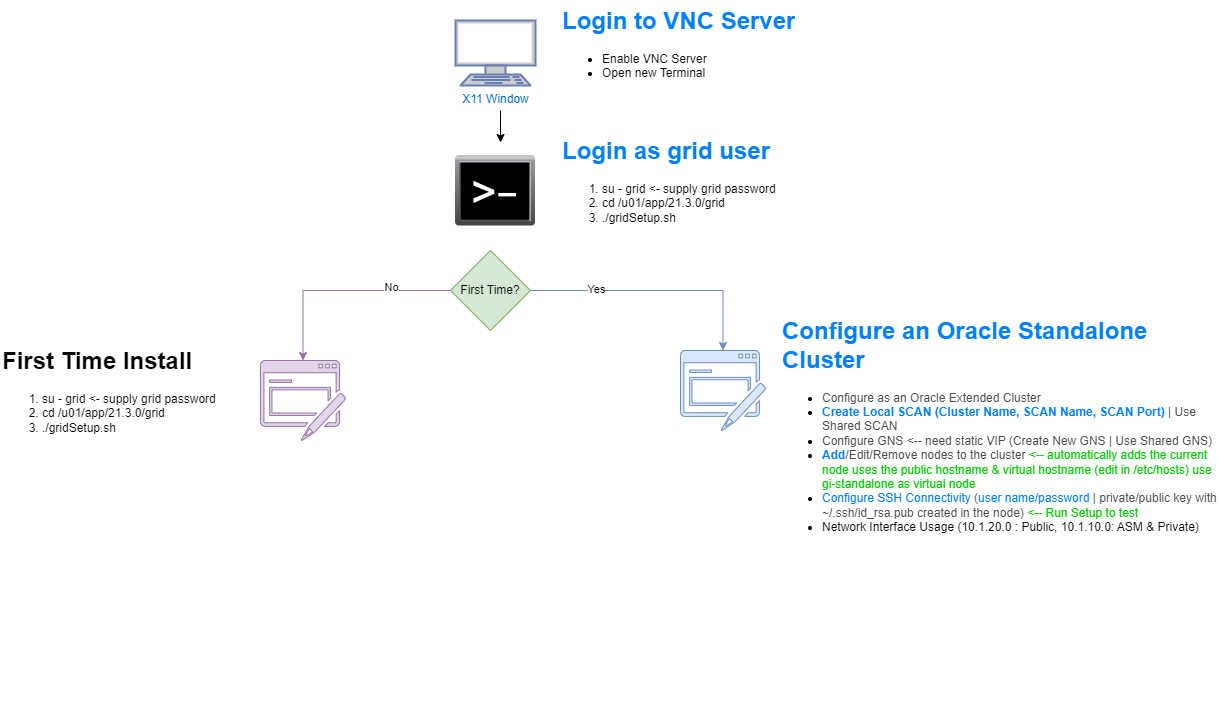
- As grid user.
$ cd $ORACLE_HOME <-- /u01/app/19.1.0/grid $ unzip -q /u01/Downloads/V982068-01.zip $ vi $ORACLE_HOME/cv/admin/cvu_config <--add the following line CV_ASSUME_DISTID=OEL8.2 <-- use export to avoid relogin - Steps on gridSetup Installer
- Configure Oracle Grid Infrastructure for a New Cluster
- Configure an Oracle Standalone Cluster
- Create the Golden Image
$ mkdir /u01/golden-images $ ./gridSetup.sh -createGoldImage -destinationLocation /u01/golden-images <--from X11 Window - Install Misc Packages
# rpm -iv $ORACLE_HOME/cv/rpm/cvuqdisk-1.0.10-1.rpm
# systemctl disable avahi-daemon.socket
# systemctl disable avahi-daemon
# systemctl stop avahi-daemon.socket
# systemctl stop avahi-daemon
# vi /etc/ssh/sshd_config
PasswordAuthentication yes
# systemctl restart sshd
Network Time Protocol for Cluster synchronization
- Disable chrony (NTP) Server on GI server and move /etc/chrony.* /u01/grid-install
#systemctl disable chronyd
#systemctl stop chronyd
#mv /etc/chrony.* /u01/grid-install
- Configure private IP &
ifcfgfileip addr add <private-ip>/<subnet-prefix-length> dev <network-interface> label <network-interface>:<sequence> #ip addr add 10.1.10.10/24 dev ens5 label ens5:0 <-- ens5 is the network interface from ifconfig vi /etc/sysconfig/network-scripts/ifcfg-<network-interface>:<sequence> # vi /etc/sysconfig/network-scripts/ifcfg-ens5:0 DEVICE="ens5:0" BOOTPROTO=static IPADDR=10.1.10.10 NETMASK=255.255.255.0 ONBOOT=yes ip addr del <private-ip>/<subnet-prefix-length> dev <network-interface>:<sequence> # ip addr del 10.1.10.10/24 dev ens5:0
Setup SSH
$mkdir .ssh && chmod 700 .ssh && cd .ssh
$ ssh-keygen -t dsa -m PEM
id_dsa is private key
id_dsa.pub is public key
Start GI Installation
As grid user in X Window terminal
$ cd $ORACLE_HOME
$ ./gridSetup.sh <-- X11 Windows
Oracle RAC Network Infrastructure
- unset the ORACLE_HOME, ORACLE_BASE, ORACLE_SID, TNS_ADMIN,ORA_CRS_HOME, ORACLE_HOME, ORA_NLS10, TNS_ADMIN environment variables
- Configure the environment of the
oracleorgriduser by performing the following tasks:- Set the default file mode creation mask (
umask) to 022 in the shell startup file. - Set the
DISPLAYenvironment variable.
- Set the default file mode creation mask (
- Disk space min 5GB on /u01
- Installation Type:
- Instant Client: Enables you to install only the shared libraries required by Oracle Call Interface (OCI), Oracle C++ Call Interface (OCCI), Pro*C, or Java database connectivity (JDBC) OCI applications. This installation type requires much less disk space than the other Oracle Database Client installation types. For more information about Oracle Database Instant Client see the following URL:https://www.oracle.com/database/technologies/instant-client.html
- Administrator:Enables applications to connect to an Oracle Database instance on the local system or on a remote system. It also provides tools that enable you to administer Oracle Database.
- Runtime:Enables applications to connect to an Oracle Database instance on the local system or on a remote system.
- Custom:Enables you to select individual components from the list of Administrator and Runtime components.
- Configure remote X system
- Install Oracle Database Preinstall/u01/OraDB19c/19.3.0/client
# dnf install -y oracle-database-preinstall-19c # mkdir /u01/db # chown oracle:oinstall /u01/db - Download Oracle Client Package from Oracle Software Deliver Cloud
- Login to VNC GUI Session for user oracle and Open Terminal window
- Extract Oracle Client Package
$ mkdir -p /u01/OraDB19c/19.0.0/client <--software will be loaded here $ mkdir -p /u01/db $ cd /u01/OraDB19c/19.0.0/client $ unzip -p /u01/Downloads/V982064-01-OracleDatabaseClient19.3.0.0.0-LINUX-x86-64.zip $ export CV_ASSUME_DISTID=OL7 $ ./runInstaller <-- follow instructions from this point on - Edit /u01/profiles/bash_profile-client19.0.0
$ export ORACLE_BASE=/u01/db/oracle $ export ORACLE_HOME=/u01/db/oracle/product/19.0.0/client_1 $ export $ORACLE_HOME/bin:$PATH - Edit /home/oracle/.bash_profile to include all the above
- Ignore missing compat-libcap1-1.10 package
- Run the root script as instructed by installation
- Restart oracle session by logging out and login or restart vncserver@:2
$ sqlplus command Troubleshooting
- Disable selinux
sestatus - on Error 49802 Initializing ADR; edit vi /u01/app/19.1.0/grid/install/orastab change oracle base to grid
- After Instance created, /etc/sysconfig/network and /etc/ssh/sshd_config files are reset, need to reconfigure
- During installation delete the file
/u01/app/19.1.0/grid/crs/install/crsgenconfig_params - rm -f /var/tmp/.oracle/npohasd
if exist - Change hostname for GI
- Restart crs manually:
/u01/app/19.1.0/grid/bin/crsctl stop has /u01/app/19.1.0/grid/bin/crsctl disable has reboot sudo su - root
export SRVM_TRACE=true <-- Enable Trace /u01/app/19.1.0/grid/root.sh After rebooting, check the cluster status using the crsctl commands: sudo su - root /u01/app/19.1.0/grid/bin/crsctl check has /u01/app/19.1.0/grid/bin/crsctl status resource -t Manually restart the Clusterware services to see if that resolves the issue: /u01/app/19.1.0/grid/bin/crsctl stop has /u01/app/19.1.0/grid/bin/crsctl start has - root.sh log on $ORACLE_BASE/crsdata/gistandalone/crsconfig/rootcrs_gistandalone_2024-05-28_08-14-22PM.log
References
Key features
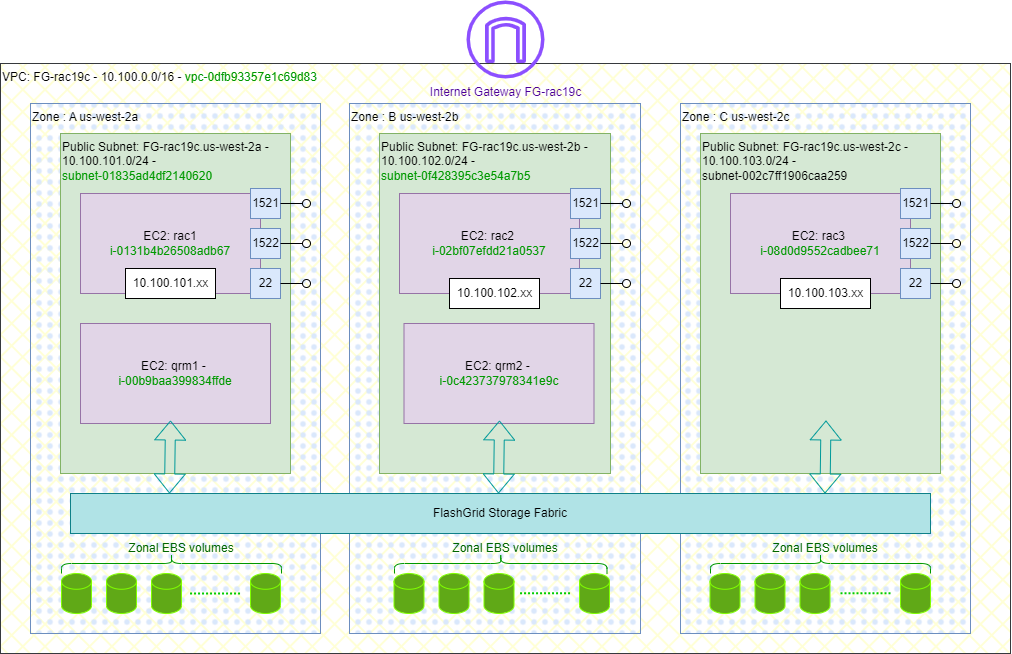
The Oracle RAC on AWS training infrastructure for this tutorial was made possible by FlashGrid technology. FlashGrid provides software and support for running mission-critical Oracle RAC databases on AWS, Azure and GCP. Please refer to the solution brief for more information.
Related Topics
Orchestrate Oracle RAC
- Run FlashGrid Launcher upload/create configuration file
- use Image type : ami-0e7cedfed43342ec6 flashgrid OL7
- Create and Use SSH key for instances
- Load Oracle files into S3 bucket
- Create an instance role EC2 to access S3 files
- Launch the CloudFormation Template
- on Each rac(x) instance edit SG add SSH access to inbound roles
- Access from LEOPARD Network IP
- Access from OCI-STUDENTS NAT IP
- Enable Public IP on Each rac instance
- Add iptables rules to allow full access from
- LEOPARD Network
- OCI STUDENT
- create Putty profile add a tunnle SSH to 5901-…
FlashGrid Networking

Create Multiple VNC Sessions per user
make-vncs.sh
$ sudo su - oracle
$ vncserver :50 -geometry 820x640  <-- best viewing on Guacamole
{{ Loop to recreate sessions per user}}
{{ run by root, creates 10 sessions for oracle :50-59, and 10 for grid :60-69}}
{{ must run on each node rac1, rac2, rac3 }}
#!/bin/bash
# Usage: make-vncs.sh  <-- will create 10 sessions for oracle 50-59,
# and 10 sessions for grid 60-69
# run as sudo
START=0
END=10

 VNCPASSWD=Pa55w0rd

 su - -c "echo $VNCPASSWD | vncpasswd -f > /home/oracle/.vnc/passwd" -s /bin/bash oracle
 su - -c "echo $VNCPASSWD | vncpasswd -f > /home/grid/.vnc/passwd" -s /bin/bash grid
for ((i=$START; i<$END; i++))
do
 oracle=$((i + 50))
 grid=$((i + 60))
 echo "Oracle :$oracle Grid :$grid"
 su - -c "vncserver -kill :$grid" -s /bin/bash grid
 su - -c "vncserver -kill :$oracle" -s /bin/bash oracle
 su - -c "vncserver :$oracle -geometry 980x640" -s /bin/bash oracle
 su - -c "vncserver :$grid -geometry 980x640" -s /bin/bash grid
done
printf "oracle user sessions"
printf "\n-------------------"
su - -c "vncserver -list" -s /bin/bash oracle
printf "\n\ngrid  user sessions"
printf "\n-------------------"
su - -c "vncserver -list" -s /bin/bash grid
restart-vncs.sh
#!/bin/bash
# Usage: make-vncs.sh  <-- will create 10 sessions for oracle 50-59,
# and 10 sessions for grid 60-69
START=0
END=10
for ((i=$START; i<$END; i++))
do
 oracle=$((i + 50))
 grid=$((i + 60))
 echo "Oracle :$oracle Grid :$grid"
 sudo su - -c "vncserver -kill :$oracle" -s /bin/bash oracle
 sudo su - -c "vncserver -kill :$grid" -s /bin/bash grid
 sudo su - -c "vncserver :$oracle -geometry 980x640" -s /bin/bash oracle
 sudo su - -c "vncserver :$grid -geometry 980x640" -s /bin/bash grid
done
echo "oracle user sessions"
echo "-------------------"
sudo su - -c "vncserver -list" -s /bin/bash oracle
printf "\n\ngrid  user sessions"
echo "-------------------"
sudo su - -c "vncserver -list" -s /bin/bash grid
Create Database with DBCA
- on Rac[n] login as oracle
$ sudo su - oracle $ vncserver -geometry 820x640 <-- supply vncpasswd New 'rac1.rac.hahacademy:1 (grid)' desktop is rac1.rac.hahacademy:1 - Run dbca <–Follow instructions
Setup Parameters:
Global Database name: orcl.rac.hahacademy
Storage Type : ASM
Database files location: +DATA/{DB_UNIQUE_NAME} <– need to change to DATA
Fast Recovery Area FRA: +FRA <– need to change to FRA
Database character set: AL32UTF8
Administrative Password: <– Supply one
Create as Containder database ->Pluggable Databasename : ORCL_P1
- Ignore warning about swap disabled <– intentionally disabled by FlashGrid
- Finish the installation
DBCA Log files:u01/app/oracle/cfgtoollogs/dbca/orcl/trace.log_2024-06-08_11-38-09AM
Database Alerts: /u01/app/oracle/diag/rdbms/orcl/orcl1/trace/alert_orcl1.log - Enable all users with the Password Management
- Now we have 3 Oracle Database Instances named (ORCL1, ORCL2, ORCL3) on each RAC node respectively
$ vi ~/.bash_profile export ORACLE_SID=orcl1 <--- case sensitive for each node - Relogin oracle user
$ sudo su - oracle
$ vncserver -list
$ vncserver -kill :1
Connecting Database Client

- After completing database creation, register LOCAL_LISTENDER for the SCAN service, as fg user
$ sudo su - fg $ flashgrid-set-local-listener-parameter-for-all-dbs - Wait 5m to refresh DNS, then Login as oracle, on rac1 Perform Checks
$ sudo su - oracle $ export ORACLE_SID=orcl1 <-- case sensitive Add to ~/.bashrc $ sqlplus / as SYSDBA SQL>SHOW SPPARAMETER LOCAL_LISTENER <-- VALUE = "NodeFQDN" - Test client connectivity
$ tnsping rac1.rac.hahacademy:1522 <--Local Listener $ tnsping fg-rac19c-scan.rac.hahacademy:1521 <-- SCAN Listener - Connect using sqlplus Local Listener
$ sqlplus "sys/Pa55w0rd@(DESCRIPTION=(ADDRESS=(PROTOCOL=tcp)(HOST=rac1.rac.hahacademy)(PORT=1522))(CONNECT_DATA=(SERVICE_NAME=orcl.rac.hahacademy)))" as sysdba <-- for username : sys as sysdba / Password: **** - Connect using sqlplus SCAN Listener
$ sqlplus "sys/Pa55w0rd@(DESCRIPTION=(ADDRESS=(PROTOCOL=tcp)(HOST=fg-rac19c-scan.rac.hahacademy)(PORT=1521))(CONNECT_DATA=(SERVICE_NAME=orcl.rac.hahacademy)))" as sysdba <-- for username : sys as sysdba / Password: **** - Configure tnsnames.ora
$ORACLE_HOME/network/admin/tnsnames.ora
Oracle Container Databases CDB
Lorem ipsum dolor sit amet, consectetur adipiscing elit. Ut elit tellus, luctus nec ullamcorper mattis, pulvinar dapibus leo.
- First time: Subscribe to FlashGrid SI OL7 on AWS Marketplace for the AWS Account, wait until AWS confirms accepting the offer “You accepted an AWS Marketplace offer” Email
- Upload Lunch Configuration for the Deployment:
- VM Type: r6i.xlarge AMI: ami-0e7cedfed43342ec6
- Disk Groups: DATA 20GB x 6, FRA 20GB x 6 Volumes are zonal, so FlashGrid Storage Fabric virtualize them on /dev/flashgrid on instances and share them across Instances nodes deployed over multiple zone
- Create S3 bucket & Upload Oracle Support files as instructed by the FlashGrid Launch tool
- Create an IAM role getS3Files <- to allow access Oracle support Files on S3 bucket,
- Do not allow assigning public IP
- Create Route 53 Hosted zone DNS for rac.hahacademy and supply DNS Hosted Zone ID, will be manually edited after cluster initialization complete
- Create a key pair to access FlashGrid Instances (EC2->Network and Security->Key Pair)
- Launch on CloudFormation on the AWS Account that subscribed to FlashGrid
- Name the stack “FG-rac19c” <– or any name
- Set Instance ssh Access key during CloudFormation launch
- Tag resources “deployment-method:FG-CloudFormation“
- takes few minutes to deploy, and upto 2h to initialize the cluster
- Cluster deployed as Oracle RAC19c Standalone Cluster
- Edit Security Group of racx instances allow SSH from Client Workstations IP or Oracle Clients
- Edit Instance Actions -> Networks->Manage IP Addresses : allow Public IP
- Swap disks must be disabled interferes with FlashGrid performance
- Run Post Finalizing scripts when prompted.
$ cat /etc/post-init-steps - Add 2/3 DNS records in Route 53 hosted domains, rac1/2.rac.hahacademy
- Add SCAN DNS Records for the cluster scan VIP
$ olsnodes -c
$ cemutlo -n
$ srvctl config scan
-
Security Groups
- SSH from LEOPARD IP (MyAddress)
- ALL TCP From OCI-Student NAT IP : for ssh, ping, and 5091 vnc viewer
-
iptables on rac instances
iptables on rac nodes is empty by default# systemctl start|stop|enable|disable|reload iptables # iptables -L --line-numbers # iptables-save > ~/iptables.txt # iptables-restore < ~/iptables.txt # iptables -[ I | A] INPUT -s 192.168.1.0/24 -p tcp --dport 22 -j ACCEPT <-- Append or Insert # iptables -D INPUT 2 <-- iptables -L --line-numbers # iptables-save > /etc/sysconfig/iptables <-- for next reboot/reload
Working with Disk Groups
- unmount disk group DATA
- sqlplus / as sysasm <– connect to +ASM instance
- SQL>drop diskgroup FRA including contents;
- SQL>inquire about available disk groups
- SQL> perform some commands as slides
- exit
- flashgrid-cluster <- verify disk group removed
- flashgrid-cluster drives <- shows drives connected
- flashgrid-node <- shows nodes and connected local devices
- Attach EBS volume use /xvdb[x] for device name
- flashgrid-dg create command
- rerun previous commands to validate
- Download the examples file LINUX.X64_193000_examples.zip
- Extract and run the installer
$mkdir -p /u01/app/db-examples
$cd /u01/app/db-examples
$ unzip -q /u01/Downloads/LINUX.X64_193000_examples.zip
$ examples/runInstaller
Sample databases installed in
$ORACLE_HOME/demo/schema - Install sample in Oracle Database (Not Container Database)
$sqlplus / as sysdba <-- use sys as dba username, and **** password SQL>@!$ORACLE_HOME/demo/schema/human_resources/hr_main.sql <---Should succeedParameters:
users default table space
temp for temporary table space
$ORACLE_HOME/demo/schema/log/ for log - Connect to HR Schema
$sqlplus hr/***
SQL>CONNECT HR/***
- Enable any firewalls, security groups between client and server TPC Ports 1521, & 1522
- Install Oracle Client on the client machine <– see instructions above
Add all the above to ~/.bash_profile
- Login as oracle
$ su - oracle - Connect to Remote Services
$ sqlplus "sys/Pa55w0rd@(DESCRIPTION=(ADDRESS=(PROTOCOL=tcp)(HOST=ec2-54-184-56-247.us-west-2.compute.amazonaws.com)(PORT=1522))(CONNECT_DATA=(SERVICE_NAME=orcl.rac.hahacademy)))" as sysdba SQL> ... - Only Oracle Database Instances allows remote sqlplus connections
Connecting to PDB with SQL*Plus
- Create a TNS Alias in $ORACLE_HOME/network/admin/tnsnames.ora for each PDB
PDB1 = (DESCRIPTION = (ADDRESS = (PROTOCOL = TCP)(HOST = fg-rac19c-scan.rac.hahacademy)(PORT = 1521)) (CONNECT_DATA = (SERVER = DEDICATED) (SERVICE_NAME = pdb1.rac.hahacademy) ) ) - Connect with SQL*Plus as oracle user
$ sqlplus system@pdb1 as sysdba
SQL>
Administer Oracle Grid Infrastructure
- Administering ASM instances has to be on local node
- Connect to local rac1,2 nodes as grid user using ssh <– need private keys