References
Workshops and Tutorials
Related topics
MOS My Oracle Support
Oracle Support works along with CSI Customer Support Identifier created on Account Creation, can be found under My Oracle Support(MOS), My Account.
Add new user support
New user create a profile in MOS, and request access from My Account, under support Identifiers -> Request Access.. <–supply CSI#

Create Instance
Lorem ipsum dolor sit amet, consectetur adipiscing elit. Ut elit tellus, luctus nec ullamcorper mattis, pulvinar dapibus leo.
Block Volumes
Lorem ipsum dolor sit amet, consectetur adipiscing elit. Ut elit tellus, luctus nec ullamcorper mattis, pulvinar dapibus leo.
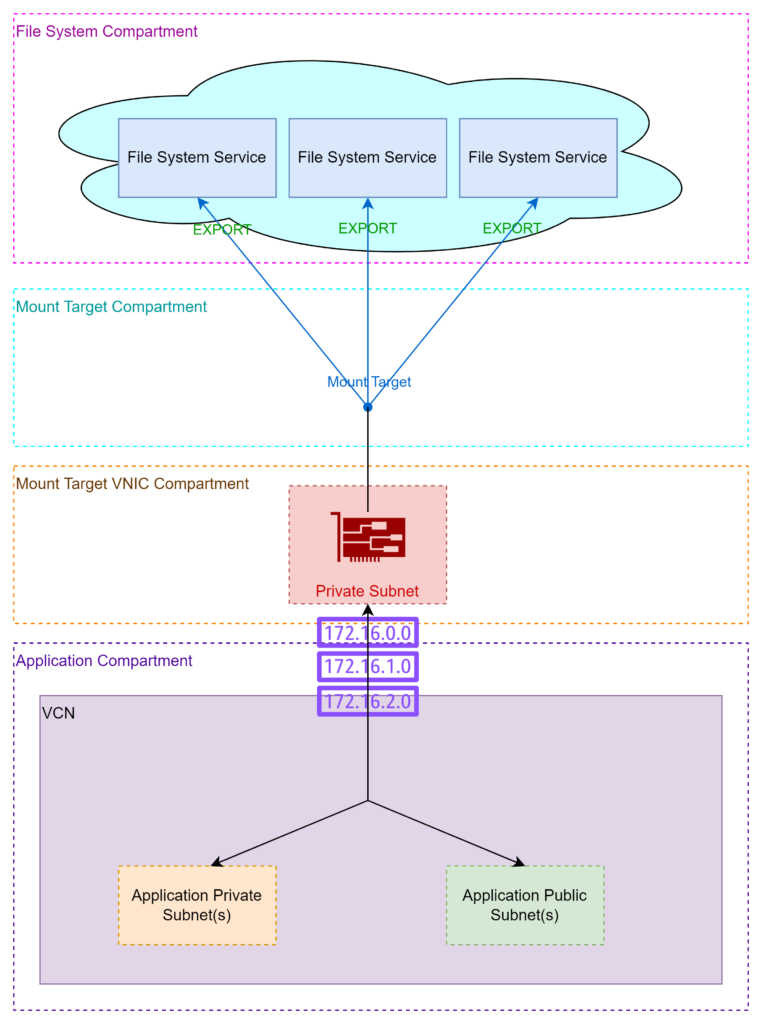
Shared File Systems
- Create Storgae::File System and Mount Target
- Enable network access (Networking::Subnet Security Groups)
Stateful ingress to TCP destination ports 111, 2048, 2049, and 2050, and UDP ports 111 and 2048.

Stateful egress for TCP source ports 111, 2048, 2049, and 2050, and UDP source port 111
- Use mount commands from File System::Exports
# yum install nfs-utils
# mkdir -p /mnt/FS-ALPHA
# mount 10.0.0.71:/FS-ALPHA /mnt/FS-ALPHA- Enable the Repositories
# dnf install -y dnf-utils zip unzip# dnf config-manager --add-repo=https://download.docker.com/linux/centos/docker-ce.repo
- Install Docker
# dnf remove -y runc# dnf install -y docker-ce --nobest
- Configure Docker Disk
MOUNT_POINT=/var/lib/docker DISK_DEVICE=/dev/sdb # New partition for the whole disk. echo -e "n\np\n1\n\n\nw" | fdisk ${DISK_DEVICE} # Add file system. # mkfs.xfs -f ${DISK_DEVICE}1 # Mount it using the UUID of the VirtualBox virtual disk. # rm -Rf /var/lib/docker # mkdir /var/lib/docker # UUID=`blkid -o export ${DISK_DEVICE}1 | grep UUID | grep -v PARTUUID` # mkdir ${MOUNT_POINT} # echo "${UUID} ${MOUNT_POINT} xfs defaults 1 2" >> /etc/fstab mount ${MOUNT_POINT} - Enable Docker Service
# systemctl enable --now docker.service # systemctl [start|stop|restart|status] docker.service # docker info # docker version - Rootless Docker
# dnf install -y fuse-overlayfs
# systemctl disable --now docker.service docker.socket
# rm /var/run/docker.sock
# sh -eux <<EOF
#Load ip_tables module
modprobe ip_tables
EOF
$ /usr/bin/dockerd-rootless-setuptool.sh install
$ systemctl --user [start|stop|restart|enable] docker
$ sudo loginctl enable-linger $(whoami) <-- Enable Docker Service at login
[INFO] Installed docker.service successfully.
[INFO] To control docker.service, run: `systemctl --user (start|stop|restart) docker.service`
[INFO] To run docker.service on system startup, run: `sudo loginctl enable-linger opc`
[INFO] Creating CLI context "rootless"
Successfully created context "rootless"
[INFO] Using CLI context "rootless"
>Current context is now "rootless"
[INFO] Make sure the following environment variable(s) are set (or add them to ~/.bashrc):
export PATH=/usr/bin:$PATH
[INFO] Some applications may require the following environment variable too:export DOCKER_HOST=unix:///run/user/1000/docker.sock
- firewalld superseded iptables,
- Zone-Based
$ firewall-cmd --get-zones
- Open Ports
#firewall-cmd [--permanent] --zone=public --add-port=80/tcp
- GUI Configurations
$sudo dnf install firewall-config
$firewall-config
- SELinux Attributes (option -Z ex. ls -aZ) user:role:type:security example
system_u:object_r:passwd_file_t:s0 - DAC (Discretionary Access Control) Permissions:
- SELinux booleans([get/set]sebool, sesearch)
- Commands:
- getenforce
- sestatus
- seinfo
- semanage fcontext
- domain
- [ch|restore]con: change context or restore context
Attach and Connect Block Volume
- Find volume UUID
#blkid - Use Device Path when attaching the volume (Attachment Type Section) ex
/dev/oracleoci/oraclevdb - Check attachement
#ll /dev/oracleoci/oraclevdb - Create a file system on the device
[root@ol8-gi ~]# mkfs.xfs /dev/oracleoci/oraclevdb : Discarding blocks...Done. - Mount and list in /etc/fstab
# mkdir /u01
# mount /dev/oracleoci/oraclevdb /u01/
# Add to /etc/fstab
/dev/oracleoci/oraclevdb /u01 xfs defaults,_netdev,nofail 0 2
VNC Users
- create users on target server
# useradd ... user1 - Add user1 to vnc user
# vi /etc/tigervnc/vncserver.users <-- Add users n:=user1 - Change OS user password
# passwd user1 - Change VNC password for user1
# su - user1 $vncpasswd <-- set password for vnc session to access user1 vnc session $exit - Disable or enable port 590n on firewalld
# systemctl stop firewalld - Start VNC Service
# systemctl start vncserver@:n
Now the VNC Service is listeneing on $(hostname).$(hostname -d):590n
Concurrent logins
Edit the file /etc/security/limits.conf
Add the lines
#<domain>      <type>   <item>          <value>
@student       -        maxlogins       4
opc            -        maxlogins       10
OCI CLI
On Windows
Python installer installs Python Launcher “py” which launches the latest release of installed Python by default, to run specific release use
PS>Py -3.11 Installation Options
-
MSI Installer
Run the MSI fileoci-cli-3.45.2-Windows-Server-Installer.msi -
Offline Installer
-
PowerShell Installer
After download the isntaller.ps1 (on Windows), the execution of the command Set-ExecutionPolicy RemoteSigned -scope <Scope> Select the higher scop of Get-ExecutionPolicy -List for example “CurrentUser” Run the following:PS>pip install scikit-learn --user PS>pip install tensorflow --upgrade --user PS>New-ItemProperty -Path "HKLM:\SYSTEM\CurrentControlSet\Control\FileSystem" -Name "LongPathsEnabled" -Value 1 -PropertyType DWORD -Force -
WSL2 Install
$sudo apt install python3 python3-pip ipython3
$bash -c "$(curl -L https://raw.githubusercontent.com/oracle/oci-cli/master/scripts/install/install.sh)"
Snapshot an Instance
- Snapshots: consistent, point-in-time view of the file system, incremental [User Created | Policy-Based | Replicated]
- Policy-Based Snapshots and Scheduling: Automate snapshots
- Console: Storage->
- mount the filesystem in the instance /mnt/mountpoint/
- create a custom image for the boot disk only, take snapshots of other Block Volumes
Remote desktop
Oracle Linux 8:
Install Linux GUI | Use Linux 8 Developer Image
# dnf -y update
# dnf groupinstall -y "Server with GUI"
# systemctl set-default graphical.target
# ln -sf /lib/systemd/system/runlevel5.target /etc/systemd/system/default.target
# reboot
- Install VNC Server
# dnf install -y tigervnc-server - Configure the users
# vi /etc/tigervnc/vncserver.users <--- display number and user in this format :<display_number>=<user> ex: :1=opc :2=user2 :3=user3 - As the <user> create the VNC password and define the default desktop (repeat for each user added in previous step, ex. user1, user2 . . . etc)
$ vncpasswd $ echo session=gnome >> .vnc/config - Start the corresponding service
# systemctl start vncserver@:<display_number> ex:# systemctl [enable|start|stop|restart] vncserver@:1 --now
Direct VNC viewer connection
# firewall-cmd --permanent --zone=public --add-port=5901/tcp
#systemctl reload firewalld
Tunnel connection with SSH
Connect using ssh
- ssh command:
$ ssh <user>@<server> -L 590<display_number>:localhost:590<display_number>ex:$ ssh opc@<server> -L 5901:localhost:5901 - Connect vncviewer
$ vncviewer localhost:<display_number>ex:$ vncviewer localhost:1Note: To use the tunnel, connect to “localhost”, not the external IP address
Connect using putty
- Launch putty

- Go to Connection -> SSH -> Tunnels

- Click “Add” and then “Open”

Repeat this step for each session ex. 5902, 5903 . . etc - Connect VNC Viewer to localhost:<session-number> ex. “localhost:1”, localhost:2, localhost:3 . . . etc.

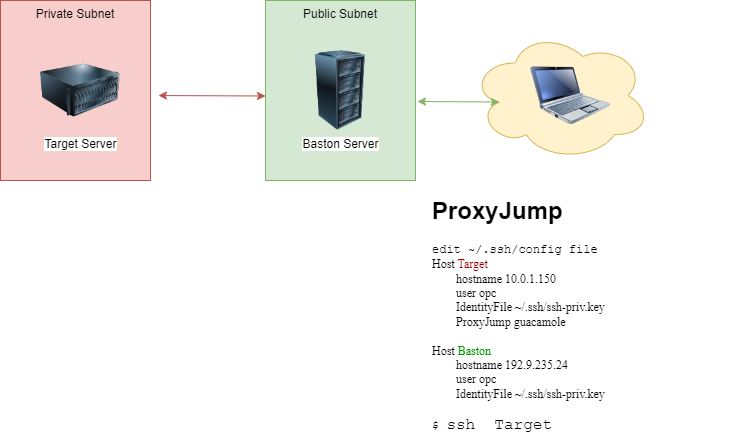
SSH JumpProxy
Lorem ipsum dolor sit amet, consectetur adipiscing elit. Ut elit tellus, luctus nec ullamcorper mattis, pulvinar dapibus leo.
Vault and Encryption Keys
Identity and Security -> Key Management & Secret Management
- Vault: Secure location used to store key


